Complete Guide to Preventive Brake Maintenance: Intervals, DIY Checks & Costly Mistakes to Avoid
Learn how often to service your brakes, how to inspect pads, rotors, and fluid yourself, and which brake maintenance mistakes lead to expensive repairs or unsafe stopping distances....

- 1. Why Preventive Brake Maintenance Matters More Than You Think
- 2. How Often Should You Service Your Brakes?
- 2.1. Brake Pad Inspection & Replacement Intervals
- 2.2. Brake Rotor (Disc) Service Intervals
- 2.3. Brake Fluid Change Intervals
- 2.4. Parking Brake (Handbrake) Service Intervals
- 3. DIY Brake Inspection: Step-by-Step
- 3.1. Safety First
- 3.2. 1. Inspect Brake Pads
- 3.3. 2. Inspect Rotors
- 3.4. 3. Check Brake Hoses and Lines
- 3.5. 4. Inspect the Brake Fluid
- 3.6. 5. Parking Brake Check
- 4. Common Brake Warning Signs You Should Never Ignore
- 4.1. 1. Squealing or Chirping Noises
- 4.2. 2. Grinding or Scraping Sounds
- 4.3. 3. Soft or Spongy Brake Pedal
- 4.4. 4. Brake Warning Lights
- 4.5. 5. Car Pulls to One Side When Braking
- 4.6. 6. Vibrations or Pulsation When Braking
- 5. Top Brake Maintenance Mistakes That Cost You Money
- 5.1. 1. Replacing Pads Without Inspecting Rotors
- 5.2. 2. Skipping Brake Hardware
- 5.3. 3. Not Cleaning and Lubricating Caliper Slide Pins
- 5.4. 4. Using the Wrong Brake Fluid or Mixing Types
- 5.5. 5. Improper Bleeding Technique
- 5.6. 6. Ignoring Other Symptoms While Focusing Only on Brakes
- 6. When to DIY and When to See a Professional
- 6.1. Good Candidates for DIY
- 6.2. Leave These to the Pros
- 7. Simple Habits That Extend Brake Life
- 8. Key Takeaways
Why Preventive Brake Maintenance Matters More Than You Think
Your brakes are the most important safety system on your car, yet they’re also one of the most neglected. Many drivers wait until they hear grinding, feel a pulsation, or notice the brake warning light before paying attention. By that point, you’re often looking at expensive repairs instead of simple maintenance.

Preventive brake maintenance is about catching wear and small issues early, so you keep stopping distances short, avoid dangerous failures, and save money over the life of the vehicle. This guide walks you through realistic service intervals, DIY inspection steps, common warning signs, and the costly mistakes that quietly destroy brake systems.

How Often Should You Service Your Brakes?
There’s no single mileage number that fits every car, but you can use these general intervals as a starting point and adjust based on your driving style and conditions.
Brake Pad Inspection & Replacement Intervals
- Quick visual check: Every 6 months or 6,000–7,500 miles (often when you rotate tires).
- Typical pad life: 25,000–60,000 miles for most daily drivers.
- Heavy use (city, towing, mountain driving): Expect closer to 20,000–30,000 miles.
- Light use (mostly highway, gentle braking): Pads can last 60,000+ miles.
Instead of relying only on mileage, use pad thickness as your main guide:
- New pads: ~10–12 mm friction material.
- Replace soon: 3–4 mm remaining.
- Replace now: 2 mm or less (many shops consider this unsafe).
Brake Rotor (Disc) Service Intervals
Rotors don’t have a fixed replacement schedule. They are replaced or resurfaced based on thickness, condition, and whether they’re warped or deeply grooved.
- Inspect rotors: Every pad change or at least every 20,000–30,000 miles.
- Measure thickness: Compare to the minimum thickness stamped on the rotor edge.
- Resurface or replace: If below spec, heavily grooved, cracked, or warped.
If you’ve ever felt a pulsation in the pedal or steering wheel when braking, that’s often a sign of rotor issues. For a deeper dive into that specific symptom, see our detailed guide on steering wheel shakes when braking.
Brake Fluid Change Intervals
Brake fluid is hygroscopic—it absorbs moisture over time. Water in the fluid lowers its boiling point and can corrode internal components like calipers, ABS modules, and master cylinders.
- Typical interval: Every 2–3 years regardless of mileage.
- High-humidity or performance driving: Every 2 years or even annually for track use.
- Check level: At every oil change; top up only with the correct DOT rating (usually DOT 3, 4, or 5.1).
Parking Brake (Handbrake) Service Intervals
- Function check: Monthly—ensure it holds the car on a hill.
- Adjustment & inspection: Every 30,000 miles or when it feels loose or pulls too high.
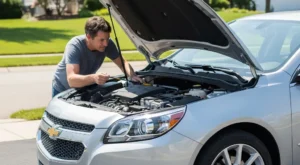
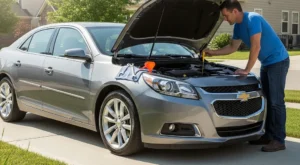
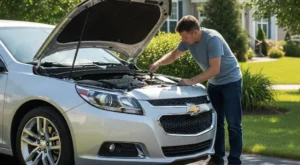
DIY Brake Inspection: Step-by-Step
You don’t need to be a professional mechanic to catch early brake problems. With basic tools and a careful approach, you can do a thorough inspection at home.
Safety First
- Park on a level surface and set the parking brake.
- Use wheel chocks on the opposite end of the car.
- Use a proper floor jack and quality jack stands; never rely on the jack alone.
- Wear eye protection and gloves.
1. Inspect Brake Pads
With the wheel removed, look through the caliper opening at the pad material.
- Thickness: Estimate or measure with a small ruler or caliper.
- Even wear: Inner and outer pads should be similar thickness.
- Glazing: Shiny, glass-like surfaces indicate overheating and reduced friction.
- Cracks or chunks missing: Replace immediately.
If one pad is much thinner than the other, the caliper slide pins may be sticking, or the caliper piston may be seizing. Ignoring this can lead to uneven braking, pulling, and premature rotor damage.
2. Inspect Rotors
Rotate the rotor by hand and look closely at the surface.
- Surface condition: Light, even scoring is normal; deep grooves or ridges are not.
- Color: Blue or purple spots indicate overheating.
- Cracks: Hairline cracks around drilled holes or across the surface are serious.
- Lip on edge: A pronounced ridge suggests significant wear.
For a more precise check, use a micrometer to measure rotor thickness at several points and compare to the stamped minimum thickness. If it’s at or below spec, replacement is the only safe option.
3. Check Brake Hoses and Lines
- Rubber hoses: Look for cracks, bulges, or wet spots (fluid leaks).
- Metal lines: Check for rust, especially near brackets and along the frame.
- Fittings: Inspect caliper connections and the master cylinder area for seepage.
Any sign of fluid leakage is an immediate safety concern. A small leak can quickly turn into a complete loss of braking.
4. Inspect the Brake Fluid
Open the hood and locate the brake fluid reservoir on the master cylinder.
- Level: Should be between MIN and MAX marks. Low fluid may indicate worn pads or a leak.
- Color: Fresh fluid is clear to light amber. Dark brown or black fluid needs replacement.
- Contamination: Cloudiness or particles are a red flag.
Never top off with the wrong type of fluid, and never mix DOT 5 (silicone-based) with DOT 3/4/5.1 fluids.
5. Parking Brake Check
- On a safe incline, apply the parking brake and gently release the foot brake.
- The car should stay put without rolling.
- If the lever pulls too high or the pedal travels too far, adjustment or cable service is needed.

Common Brake Warning Signs You Should Never Ignore
Preventive maintenance is ideal, but you should also know the early warning signs that your brakes need immediate attention.
1. Squealing or Chirping Noises
Many brake pads have built-in wear indicators that squeal when the pad material is low.
- High-pitched squeal when moving: Often the wear indicator touching the rotor.
- Noise goes away when braking: Another clue it’s the wear indicator.
Replace pads soon; waiting too long can turn that squeal into a grinding noise as metal contacts metal.
2. Grinding or Scraping Sounds
Grinding usually means the pad material is gone and the metal backing plate is cutting into the rotor.
- Result: Severely damaged rotors, longer stopping distances, and much higher repair costs.
- Action: Stop driving the car except to get it repaired.
3. Soft or Spongy Brake Pedal
A pedal that sinks too far or feels soft can indicate:
- Air in the brake lines (often after improper bleeding).
- Brake fluid leak.
- Failing master cylinder.
This is a serious safety issue. Have the system inspected and bled properly before driving further.
4. Brake Warning Lights
Modern cars may have several brake-related warning lights:
- Red brake light: Often indicates low fluid, parking brake engaged, or hydraulic issue.
- ABS light: Problem with the anti-lock braking system; base brakes may still work, but ABS may be disabled.
Don’t ignore warning lights. They can be triggered by something as simple as a low fluid level or as serious as a failing ABS module.
5. Car Pulls to One Side When Braking
This can be caused by a sticking caliper, uneven pad wear, or contaminated friction surfaces. It’s not only annoying; it’s dangerous in emergency stops and can quickly wear tires and suspension components.
6. Vibrations or Pulsation When Braking
If you feel the steering wheel or brake pedal shaking when you apply the brakes, your rotors may be warped, unevenly worn, or contaminated. For a full breakdown of causes and fixes, see our in-depth article on steering wheel shakes when braking.
Top Brake Maintenance Mistakes That Cost You Money
Even well-intentioned DIYers and shops can make mistakes that shorten brake life or create new problems. Avoid these common pitfalls.
1. Replacing Pads Without Inspecting Rotors
Slapping new pads onto badly worn or glazed rotors is a recipe for noise, vibration, and poor braking performance.
- New pads may not bed in properly.
- Stopping distances can increase.
- Noise and pulsation are more likely.
Always inspect rotor thickness and condition. If they’re near minimum thickness, deeply grooved, or warped, replacement is usually the smarter long-term choice.
2. Skipping Brake Hardware
Brake hardware includes pad clips, shims, and anti-rattle springs. Reusing rusty or bent hardware can cause:
- Uneven pad wear.
- Sticking pads that drag and overheat.
- Annoying squeaks and rattles.
Most quality pad kits include new hardware—use it. Clean the caliper bracket surfaces and apply a light coating of high-temperature brake grease where specified.
3. Not Cleaning and Lubricating Caliper Slide Pins
Caliper slide pins allow the caliper to move freely and apply even pressure to both pads. When they seize:
- One pad wears much faster than the other.
- Brakes may drag, causing overheating and warped rotors.
- The car may pull to one side when braking.
During any brake job, remove the slide pins, clean them, and lubricate with the correct high-temperature brake grease. Replace torn rubber boots to keep moisture out.
4. Using the Wrong Brake Fluid or Mixing Types
Using the wrong fluid can damage seals and reduce braking performance.
- Always match the DOT rating specified on the reservoir cap or owner’s manual.
- Never mix DOT 5 (silicone) with DOT 3/4/5.1 fluids.
- Don’t use power steering fluid or ATF in the brake system—this will destroy rubber components.
5. Improper Bleeding Technique
Air in the brake lines compresses, which leads to a soft pedal and reduced braking power.
- Follow the correct bleeding sequence (often RR, LR, RF, LF, but check your service manual).
- Don’t let the reservoir run dry during bleeding.
- Use a helper or a proper one-man bleeder tool; avoid pumping too aggressively, which can aerate the fluid.
6. Ignoring Other Symptoms While Focusing Only on Brakes
Sometimes what feels like a brake issue is actually another system. For example:
- A car that won’t crank but just clicks when you turn the key is often an electrical or starter issue, not brakes. If you encounter this, see our full guide on car makes clicking noise but won’t start.
- White smoke from the exhaust can indicate coolant or oil burning, which is unrelated to brakes but very serious. Learn more in our article on white smoke from exhaust but car runs fine.
When in doubt, step back and consider the whole vehicle, not just the brakes.
When to DIY and When to See a Professional
Many brake maintenance tasks are within reach of a careful DIYer, but there are times when professional help is the safer choice.
Good Candidates for DIY
- Visual inspections of pads, rotors, and hoses.
- Basic pad and rotor replacement on non-ABS or standard systems (with proper tools and guidance).
- Cleaning and lubricating slide pins and hardware.
- Brake fluid flush using a quality one-man bleeder or vacuum bleeder, if you’re comfortable and follow procedures closely.
Leave These to the Pros
- ABS module diagnostics and repairs.
- Brake line fabrication and replacement (requires proper flaring tools and knowledge).
- Severe rust or seized components that may require heat or specialized tools.
- Master cylinder replacement and system re-bleeding on complex modern vehicles.
If you’re unsure, it’s better to pay for a professional inspection than to risk compromised braking performance.
Simple Habits That Extend Brake Life
How you drive has as much impact on brake life as how you maintain them. A few small habit changes can significantly reduce wear and keep your brakes performing like new.
- Look far ahead: Anticipate traffic lights and slowdowns so you can coast instead of braking hard.
- Avoid tailgating: Following too closely forces frequent, harder braking.
- Downshift on long descents: Use engine braking (especially in trucks and SUVs) to reduce brake load.
- Remove unnecessary weight: Heavy cargo increases stopping distances and brake temperatures.
- Use the parking brake regularly: Keeps cables and mechanisms from seizing, especially on rear drum or drum-in-hat setups.
Key Takeaways
- Inspect pads and rotors at least every 6 months or 6,000–7,500 miles.
- Change brake fluid every 2–3 years to prevent corrosion and fade.
- Never ignore squealing, grinding, pulling, or warning lights.
- Replace worn hardware and lubricate slide pins during every brake job.
- Know your limits—complex brake work and ABS issues are best left to professionals.
With consistent preventive maintenance and smart driving habits, you can keep your brakes reliable, quiet, and powerful for years, while avoiding the kind of sudden failures that put you and your passengers at risk.
How do you rate this guide?
Related Posts
Comments have been disabled.
