DIY Oil Change for Beginners: Step‑by‑Step Guide to Protect Your Engine and Save Money
New to car maintenance? Learn how to do a safe, clean DIY oil change at home with basic tools, clear steps, and practical tips to protect your engine and wallet....

Changing your own oil is one of the easiest and most rewarding DIY car repairs. You can save money, learn more about your vehicle, and be confident the job is done right. With a few basic tools and some preparation, most beginners can complete an oil change in under an hour.
- 1. Why a DIY Oil Change Matters for Engine Life
- 2. Tools and Supplies You Need for a DIY Oil Change
- 2.1. Essential tools
- 2.2. Fluids and parts
- 3. How to Choose the Right Oil and Filter
- 3.1. Picking the correct oil
- 3.2. Choosing a quality oil filter
- 4. Step-by-Step DIY Oil Change for Beginners
- 4.1. 1. Prepare the car and work area
- 4.2. 2. Locate the drain plug and filter
- 4.3. 3. Drain the old oil
- 4.4. 4. Remove and replace the oil filter
- 4.5. 5. Add new oil
- 4.6. 6. Check the oil level and adjust
- 5. Common Beginner Mistakes and How to Avoid Them
- 6. How Often Should You Change Your Oil?
- 7. How to Dispose of Used Oil and Filters Properly
- 8. Summary and Next Steps
This guide walks you through everything: how to choose the right oil and filter, what tools you actually need, and each step from draining the old oil to resetting the maintenance light.
Why a DIY Oil Change Matters for Engine Life


Engine oil does more than just “lubricate.” It carries away heat, suspends dirt and metal particles, and protects internal parts from wear and corrosion. When oil breaks down or gets contaminated, your engine runs hotter and wears faster.
Regular oil changes help prevent sludge buildup, noisy operation, and expensive repairs like worn timing chains or even engine failure. Doing it yourself means you control the quality of oil and filter used, and you can spot other issues (leaks, loose components, worn belts) while you are under the car.
Tools and Supplies You Need for a DIY Oil Change
You do not need a full mechanic’s toolbox to change your oil, but having the right basics makes the job safer and cleaner.
Essential tools
- Floor jack and jack stands or sturdy ramps rated for your vehicle weight
- Wheel chocks (blocks) to prevent the car from rolling
- Socket or box-end wrench for the drain plug (often 13–19 mm or 1/2″–3/4″)
- Oil filter wrench (cap style or band style, sized for your filter)
- Drain pan (at least 8–10 quarts capacity)
- Funnel that fits your oil fill opening
- Shop rags or paper towels
- Gloves and safety glasses
Fluids and parts
- Correct engine oil (type and viscosity, e.g., 0W-20 synthetic)
- New oil filter (correct part number for your car)
- New drain plug washer or crush washer (if your car uses one)
- Brake cleaner or degreaser (optional, for cleanup)
Always confirm the correct oil viscosity, capacity, and filter part number in your owner’s manual. Using the wrong oil can affect engine protection and fuel economy.
How to Choose the Right Oil and Filter
Before you crawl under the car, you need the right oil and filter on hand. This is where many beginners get stuck, but it is simpler than it looks.
Picking the correct oil
- Check the owner’s manual. Look for a section titled “Engine Oil” or “Lubrication.” It will list the recommended viscosity (like 5W-30) and whether synthetic is required.
- Match the viscosity exactly. If your manual says 0W-20, do not substitute 10W-30 just because it is on sale. Modern engines are designed around specific viscosities.
- Choose conventional, synthetic blend, or full synthetic. Many newer cars specify synthetic. Even if not required, full synthetic often gives better high-temperature protection and longer life, which is helpful if you sometimes stretch intervals.
- Buy enough for your engine’s capacity. Most 4-cylinder engines take 4–5 quarts; many V6 and V8 engines take 5–8 quarts. The manual will give an exact number, often listed as “with filter.” Buy at least that amount.
Choosing a quality oil filter
- Use the exact part number for your vehicle. Cross-reference using the parts store catalog or the oil filter manufacturer’s guide by year, make, model, and engine size.
- Aim for a mid- to high-quality filter. You do not need the most expensive racing filter, but avoid the absolute cheapest options. A good filter has better media and an anti-drainback valve that helps with cold starts.
- Consider your driving and intervals. If you drive mostly short trips or plan longer oil change intervals, a higher-quality filter with better filtration and capacity is worth a few extra dollars.
While you are planning maintenance, it is a good time to think about other DIY jobs like DIY brake pad and rotor replacement so you can batch tasks when the car is already safely lifted.
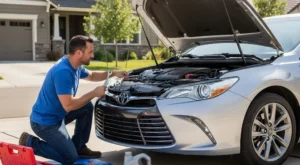
Step-by-Step DIY Oil Change for Beginners
Work on a flat, stable surface with the engine off and the parking brake set. Allow the engine to cool enough that you will not burn yourself, but slightly warm oil drains faster and more completely.
1. Prepare the car and work area
- Gather all tools and supplies. Lay out your jack, stands or ramps, drain pan, new oil, filter, funnel, and rags before you start. This prevents messy scrambling mid-job.
- Warm the engine briefly. If the car is cold, start it and let it idle for 3–5 minutes, then shut it off. Do not work under a running engine.
- Secure the vehicle. Place wheel chocks behind the rear tires if you are lifting the front. Engage the parking brake.
- Lift and support the car. Use a floor jack on the recommended jacking point, then place jack stands under the designated support points. If using ramps, drive up slowly and double-check the car is centered and stable.
2. Locate the drain plug and filter
- Identify the oil pan. It is usually a metal pan at the bottom of the engine, with a single drain plug (a bolt) at the lowest point. Do not confuse it with the transmission pan.
- Find the oil filter. It may be underneath (spin-on canister), on the side of the engine, or on top in a cartridge-style housing. Check your manual or a repair guide if you are unsure.
- Position the drain pan. Place it under the drain plug, slightly toward the direction the oil will flow when the plug is removed.
3. Drain the old oil
- Remove the oil fill cap on top of the engine. This allows air in and helps the oil drain faster.
- Loosen the drain plug. Use the correct-size wrench or socket. Turn counterclockwise just enough to loosen, then finish by hand while pressing the plug inward to prevent oil from leaking until you are ready.
- Remove the plug and let the oil flow. Pull the plug away quickly and let the oil drain completely into the pan. It may initially shoot out at an angle, then slow to a drip.
- Inspect the drain plug and washer. Wipe them clean. If the washer is crushed, cracked, or missing, replace it. Some plugs have built-in seals that should be replaced periodically.
- Reinstall the drain plug. Once the oil is down to a slow drip, thread the plug in by hand to avoid cross-threading. Then snug it with the wrench. Do not overtighten; you are compressing the washer, not crushing the pan threads.
4. Remove and replace the oil filter
- Move the drain pan under the filter. Some oil will spill when you remove it.
- Loosen the old filter. Use the oil filter wrench if needed. Turn counterclockwise. Once loose, spin it off by hand, keeping it upright as much as possible to minimize spills.
- Check the sealing surface. Make sure the old rubber gasket is not stuck to the engine. If the old gasket remains and you install a new filter on top of it, you will have a major oil leak.
- Prepare the new filter. For spin-on filters, lightly coat the new rubber gasket with fresh oil. This helps it seal and makes removal easier next time. For cartridge filters, follow the instructions for O-ring placement and orientation.
- Install the new filter. Thread it on by hand until the gasket contacts the sealing surface, then tighten according to the instructions on the filter (often 3/4 to 1 full turn by hand). Do not use a wrench to overtighten unless the manufacturer specifically instructs it.
5. Add new oil
- Set the funnel in the oil fill opening. This helps prevent spills on the engine.
- Pour in most of the required oil. If your engine capacity is 5 quarts, start by adding about 4–4.5 quarts. You can top off after checking the level.
- Reinstall the oil fill cap. Make sure it is fully seated and locked.
- Start the engine and check for leaks. Let it idle for 30–60 seconds while you look underneath at the drain plug and filter. If you see any drips, shut the engine off and correct the issue immediately.
6. Check the oil level and adjust
- Shut the engine off and wait a couple of minutes. This allows oil to drain back into the pan.
- Check the dipstick. Pull it out, wipe it clean, reinsert fully, then pull it again. The oil should be between the “low” and “full” marks, ideally near the full mark.
- Top off if needed. Add oil in small amounts (a few ounces at a time), rechecking the dipstick until you reach the proper level. Do not overfill; too much oil can cause foaming and leaks.
- Record the mileage and date. Note the odometer reading and date of your oil change. This helps you track intervals and is useful if you ever sell the car.
Common Beginner Mistakes and How to Avoid Them

Even careful beginners can make small mistakes that lead to leaks, warning lights, or messes. Knowing the common pitfalls helps you avoid them.
- Overtightening the drain plug or filter. This can strip threads or crush gaskets. Always follow torque specs if available, or tighten just past snug by hand plus a small additional turn.
- Forgetting the drain plug washer. A missing or damaged washer often causes slow leaks. Replace it whenever it looks worn or distorted.
- Leaving the old filter gasket in place. Double-gasketing almost always leads to a big leak once the engine builds pressure.
- Adding the wrong amount of oil. Double-check the capacity and use the dipstick as your final confirmation. Both underfilling and overfilling are harmful.
- Working under an unsupported car. Never rely solely on a jack. Always use jack stands or ramps on a solid surface.
While you are under the car, take a quick look at other components. If you notice noises when steering or see fluid near the steering rack, you may want to read up on car makes noise when turning the steering wheel issues and plan further diagnosis.
How Often Should You Change Your Oil?
Oil change intervals depend on your vehicle, oil type, and driving conditions. Many modern cars with synthetic oil can safely go 7,500–10,000 miles under normal conditions, while older recommendations were often 3,000–5,000 miles.
- Follow the owner’s manual first. It will list normal and severe service intervals.
- Consider your driving style. Lots of short trips, idling, towing, or extreme temperatures count as severe use and may justify shorter intervals.
- Watch the maintenance reminder. Many cars have an oil life monitor. After a DIY oil change, you will need to reset it using the procedure in your manual.
If you are driving a specific model with known quirks, like a compact SUV, it is worth researching long-term reliability and maintenance patterns, similar to how owners look at Toyota RAV4 reliability by year to plan maintenance and avoid trouble years.
How to Dispose of Used Oil and Filters Properly
Used motor oil is hazardous to the environment and must never be poured on the ground, into drains, or into household trash. Fortunately, proper disposal is easy and often free.
- Transfer used oil to a sealed container. Use the empty oil jugs or a dedicated drain container with a cap. Avoid mixing oil with other fluids like coolant or brake cleaner.
- Drain the old filter. Let it sit upside down over the drain pan for several hours so most of the oil drains out.
- Take oil and filters to a recycling location. Many auto parts stores and local recycling centers accept used oil and filters at no charge. Call ahead to confirm limits and hours.
- Keep records. Note where and when you recycled. It is good practice and sometimes required in certain areas.
Summary and Next Steps
Doing your own oil change is a straightforward DIY repair that protects your engine and saves money. With the right tools, correct oil and filter, and a methodical approach, most beginners can handle the job safely in less than an hour.
As you get comfortable under the car, you can expand into other basic maintenance like brakes, filters, and simple inspections. If you encounter stripped threads, major leaks, or warning lights that will not clear after an oil change, it is wise to consult a trusted mechanic. When in doubt about safety or proper support of the vehicle, stop and seek professional help before continuing.
How do you rate this guide?
Related Posts


Comments have been disabled.
