Beginner’s Guide to Car Electrical Problems: Simple Checks for Lights, Fuses, and Power Drains
Learn how to track down basic car electrical problems, from dead lights and blown fuses to slow battery drains, using simple tools and beginner‑friendly checks....

Electrical problems can make a car feel mysterious and frustrating. One day everything works, the next day a headlight is out, the radio dies, or the battery keeps going flat overnight. The good news is that many basic electrical issues can be narrowed down with simple checks you can do at home, even if you are a beginner.
- 1. Basic Safety and Tools for Electrical Checks
- 2. How to Diagnose Car Light Problems (Headlights, Brake Lights, Interior Lights)
- 2.1. Step 1: Confirm Which Lights Are Not Working
- 2.2. Step 2: Inspect and Replace Light Bulbs
- 2.3. Step 3: Check Fuses for Light Circuits
- 2.4. Step 4: Check Switches and Common Light Circuit Issues
- 3. How to Read and Replace Car Fuses Safely
- 3.1. Step 1: Understand Fuse Ratings and Colors
- 3.2. Step 2: Use the Fuse Diagram Like a Map
- 3.3. Step 3: Replace Fuses the Right Way
- 4. Finding and Fixing Battery Power Drains (Parasitic Draws)
- 4.1. Common Signs of a Parasitic Draw
- 4.2. Step 1: Rule Out Obvious Causes
- 4.3. Step 2: Prepare for a Parasitic Draw Test
- 4.4. Step 3: Measure the Parasitic Draw with a Multimeter
- 4.5. Step 4: Use the Fuse‑Pull Method to Find the Problem Circuit
- 4.6. Step 5: Common Sources of Parasitic Draws
- 5. Preventing Future Electrical Problems
- 6. Summary and Next Steps
This guide walks you through practical, step‑by‑step checks for three of the most common electrical trouble areas: lights that do not work, fuses that keep blowing, and slow battery power drains (parasitic draws). You will learn what to look for, what you can safely fix yourself, and when it is time to see a professional.
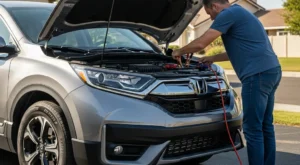
Basic Safety and Tools for Electrical Checks
Before you start chasing electrical gremlins, it is important to stay safe and have a few basic tools ready. You do not need advanced diagnostic gear, but a few simple items make troubleshooting much easier.

Minimum tools and supplies:
- Owner’s manual (for fuse box diagrams and bulb types)
- Basic flashlight or work light
- Flathead and Phillips screwdrivers
- Needle‑nose pliers or fuse puller
- Digital multimeter (cheap ones are fine for beginners)
- Gloves and safety glasses
Safety tips before working on car electrics:
- Turn the ignition off before pulling fuses or bulbs unless the procedure specifically calls for them to be on.
- For work near the battery or main power cables, disconnect the negative battery terminal to avoid short circuits.
- Never replace a fuse with one of a higher amp rating. This can overheat wiring and start a fire.
- Keep metal tools away from exposed battery terminals and large power connections.
If your car already has trouble starting, combine these checks with the guidance in Car Won’t Start but Battery Is Good: Beginner’s Guide to Fast Checks and Easy Fixes for a fuller picture.
How to Diagnose Car Light Problems (Headlights, Brake Lights, Interior Lights)
Lights are one of the most common electrical complaints: a headlight is out, brake lights do not work, or interior lights stay on and drain the battery. The basic approach is the same: confirm the symptom, check the bulb, check the fuse, and then look at switches and wiring.
Step 1: Confirm Which Lights Are Not Working
- Test all exterior lights. Turn the ignition to the accessory or on position and check headlights (low and high beam), turn signals, hazard lights, brake lights, tail lights, and reverse lights. Have a helper stand behind and in front of the car while you operate each control.
- Check interior lights. Turn dome lights, map lights, and trunk or cargo lights on and off. Note any that are dim, flickering, or stuck on.
- Look for patterns. If multiple lights on one side or in one circuit are out (for example, both tail lights), that points more toward a fuse or wiring issue than a single bad bulb.
Step 2: Inspect and Replace Light Bulbs
Burned‑out bulbs are the simplest and most common cause of light failures. Many can be replaced in minutes with basic tools.
- Check your owner’s manual for bulb locations and part numbers. This ensures you buy the correct replacement.
- Access the bulb. For headlights and tail lights, you usually remove a rear cover or a few screws to pull the light housing or bulb socket out from behind.
- Inspect the bulb closely. Look for a broken filament, dark or cloudy glass, or burn marks. Any of these means the bulb is bad.
- Compare with a new bulb. If you are unsure, buy one new bulb and compare brightness by swapping it into the suspect location.
- Install the new bulb carefully. Avoid touching the glass on halogen bulbs with bare fingers; oils can shorten their life. Use a clean tissue or gloves.
- Test the light. Turn the switch back on before reassembling everything fully to make sure the new bulb works.
If a new bulb does not light up, move on to fuse and power checks.
Step 3: Check Fuses for Light Circuits
Fuses protect wiring from overloads. When too much current flows, the fuse melts and opens the circuit. A blown fuse is a symptom, not the root cause, but it is a key clue.
- Locate the fuse boxes. Most cars have one under the dash and another under the hood. Your owner’s manual will show exact locations and diagrams.
- Identify the correct fuse. Use the diagram to find fuses labeled for headlights, tail lights, brake lights, interior lights, or similar.
- Pull the fuse. Use a fuse puller or needle‑nose pliers to gently remove it.
- Inspect the fuse element. A good fuse has an unbroken metal strip. A blown fuse will have a visible gap or burn mark.
- Test with a multimeter (optional but helpful). Set the meter to continuity or resistance and touch both fuse blades. A good fuse will show continuity (or near‑zero ohms); a bad one will show open circuit.
- Replace only with the same rating. Match the amp rating (e.g., 10A, 15A) and type (mini, standard, etc.).
- Retest the light. If the light now works and the fuse does not blow again, you may have had a one‑time surge or aging bulb failure.
If the new fuse blows immediately when you turn the lights on, there is a short circuit or wiring problem. At that point, it is safer to have a professional trace the wiring, especially if multiple systems are affected.
Step 4: Check Switches and Common Light Circuit Issues
If bulbs and fuses are good but lights still do not work, the problem may be in a switch or connection.
- Headlight switch: If both low and high beams are out, suspect the main headlight switch or a relay. If only one beam setting fails, it is more often a fuse, bulb, or wiring to that beam.
- Brake light switch: If all brake lights are out but tail lights work, check the brake pedal switch. It is usually mounted above the pedal and can fail or get misadjusted.
- Door switches for dome lights: If interior lights stay on, a sticky or broken door jamb switch is common. Press each switch by hand and see if the light turns off.
- Loose connectors: Wiggle the bulb sockets and connectors gently. If the light flickers, you may have corrosion or a loose connection that needs cleaning or replacement.
Corrosion in bulb sockets and connectors often shows as green or white crust. You can gently clean light corrosion with electrical contact cleaner and a small brush, but heavy corrosion usually means the part should be replaced.
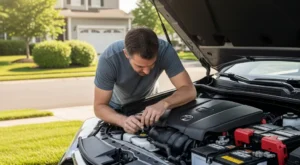
How to Read and Replace Car Fuses Safely
Fuses are the front line of defense for your car’s electrical system. Learning how to read fuse diagrams and replace fuses properly will save you time and prevent bigger problems.
Step 1: Understand Fuse Ratings and Colors
Each fuse has an amp rating printed on it (like 5A, 10A, 15A). This is the maximum current that circuit is designed to handle.
- Color coding: Automotive blade fuses are color‑coded by rating. For example, 10A is usually red, 15A blue, 20A yellow. Always confirm the printed number.
- Never “up‑fuse”: Installing a higher‑amp fuse (for example, 20A where 10A belongs) can let too much current flow and overheat wires. This is a fire risk.
Step 2: Use the Fuse Diagram Like a Map
- Find the legend. Inside the fuse box cover or in the owner’s manual, there will be a diagram showing which fuse controls which circuit.
- Match circuits to symptoms. If your radio and interior lights are dead, look for fuses labeled “AUDIO,” “RADIO,” “INT LAMP,” or similar.
- Check related fuses. Some systems use more than one fuse. If you are chasing a problem, inspect all fuses related to that system.
Step 3: Replace Fuses the Right Way
- Turn the ignition off. This reduces the chance of arcing or damaging electronics.
- Remove the suspect fuse. Use a fuse puller or pliers and pull straight out to avoid bending the blades.
- Inspect and test. Look for a broken element or use a multimeter to confirm it is open.
- Install the new fuse. Push the replacement in firmly until it seats fully.
- Test the system. Turn the car on and operate the device (lights, radio, etc.) to confirm it works.
If a fuse blows repeatedly, do not keep replacing it. That means there is an underlying short or component fault. Repeatedly installing new fuses can mask a dangerous problem.
Finding and Fixing Battery Power Drains (Parasitic Draws)
A parasitic draw is an electrical load that continues to pull power from the battery when the car is turned off. Some small draw is normal (for things like the clock and security system), but too much will drain the battery overnight or over a few days.
If your car often has a dead battery after sitting, but the battery and charging system test good, you may have a parasitic drain. Combine this section with the starting tips in Car Won’t Start in the Morning: Simple Beginner Checks Before You Call a Tow Truck for a more complete diagnosis.
Common Signs of a Parasitic Draw
- Battery goes dead after sitting overnight or for a day or two.
- You hear relays clicking or fans running long after the car is shut off.
- Interior, glove box, or trunk lights stay on or flicker when they should be off.
- After jump‑starting, the car runs fine, but the problem returns the next time it sits.
Step 1: Rule Out Obvious Causes
Before using a multimeter, check for simple, visible problems.
- Check all lights. Make sure dome lights, map lights, and trunk or glove box lights turn off when closed. Look through windows in a dark area to see if anything stays lit.
- Check accessories. Unplug phone chargers, dash cams, or aftermarket devices from the 12V outlet. Some draw power even with the ignition off.
- Listen for fans or pumps. After shutting the car off, stand near the engine bay and rear of the car. Some cooling fans may run briefly, but they should not run for many minutes.
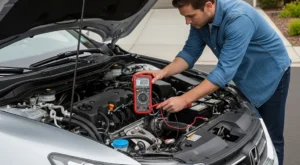
Step 2: Prepare for a Parasitic Draw Test
To measure draw, you will use a multimeter in series with the battery. This is safe if you follow the steps carefully.
- Fully charge the battery. A weak battery can give confusing results. Charge it or drive long enough for the alternator to recharge it.
- Turn everything off. Remove the key, close all doors (use the latch with the door open if needed), and make sure lights and accessories are off.
- Wait 20–45 minutes. Many modern cars keep some modules awake for a while after shutdown. Waiting lets them go into sleep mode, so you measure the true resting draw.
Step 3: Measure the Parasitic Draw with a Multimeter
- Set the meter to amps (A) or mA. Start on the highest amp range to protect the meter, then step down if needed.
- Disconnect the negative battery cable. Loosen the clamp and lift it off the battery post. Do not let it touch the post while testing.
- Connect the meter in series. Attach one meter lead to the negative battery post and the other to the removed negative cable. This routes all current through the meter.
- Read the current draw. A typical modern car might show 20–50 mA at rest. Anything consistently above about 80–100 mA is suspicious for a drain.
Important: Do not try to start the car or turn on high‑draw devices while the meter is in series. That can blow the meter’s internal fuse.
Step 4: Use the Fuse‑Pull Method to Find the Problem Circuit
Once you know you have an excessive draw, the next step is to find which circuit is responsible. The easiest beginner method is to pull fuses one by one while watching the meter.
- Keep the meter connected. Make sure the draw reading is stable.
- Access the fuse boxes. Start with the interior fuse box, since many always‑on circuits are there.
- Pull one fuse at a time. Gently remove a fuse and watch the meter. If the reading drops significantly (for example, from 300 mA to 40 mA), you have found the circuit that contains the drain.
- Note the fuse label. Write down the fuse number and description from the diagram (for example, “Radio,” “Body Control Module,” “Interior Lights”).
- Reinsert the fuse before moving on. This keeps the system as close to normal as possible while you test others.
Once you identify the problem circuit, you can narrow it further by unplugging components on that circuit (such as the radio, aftermarket alarm, or a specific module) until the draw drops to normal.
Step 5: Common Sources of Parasitic Draws
Some issues show up again and again in real‑world cars:
- Stuck relays: A relay that fails “on” can keep a fan, pump, or module powered. If the draw drops when you pull a specific relay, that relay or the component it controls may be at fault.
- Aftermarket electronics: Poorly installed stereos, alarms, remote starters, or dash cams often cause drains. If your problem started after an installation, suspect that first.
- Glove box or trunk lights: Misadjusted switches can leave these lights on with the lid closed. Remove the bulb or unplug the switch and see if the draw drops.
- Faulty modules: Body control modules, door modules, or infotainment units sometimes fail to go to sleep. These are usually best diagnosed and replaced by a professional.
If you are not comfortable unplugging modules or working around airbag circuits, stop once you have identified the problem fuse and share that information with a mechanic. It will save diagnostic time and cost.
Preventing Future Electrical Problems
Many electrical issues are preventable with simple habits and basic maintenance. You do not need to be an expert to reduce the chances of being stranded with a dead battery or dark headlights.
- Inspect exterior lights regularly. Once a month, walk around your car at night and check all lights. Fixing a single bad bulb early prevents safety issues and tickets.
- Keep battery terminals clean. Corrosion on battery posts can cause starting problems and voltage drops. Clean them periodically and ensure the clamps are tight.
- Avoid overloading 12V outlets. High‑draw devices or multiple chargers can overheat wiring or blow fuses.
- Be cautious with DIY wiring. If you add accessories, use proper fuse taps, correct wire sizes, and good grounds. Poor connections are a common source of intermittent faults.
- Follow maintenance schedules. A worn serpentine belt can affect charging system performance; see DIY Serpentine Belt Replacement and Inspection: Stop Squeals, Slips and Breakdowns for belt checks that help keep your alternator working properly.
- Rotate tires and inspect while wheels are off. When following the steps in Beginner’s Guide to Tire Rotation: Simple Steps to Prevent Uneven Wear and Save Money, use the opportunity to glance at wiring and connectors near the wheel wells for damage.
Summary and Next Steps
Car electrical problems do not have to be intimidating. By breaking them down into simple checks for bulbs, fuses, switches, and parasitic draws, you can solve many issues yourself or at least pinpoint the problem area before visiting a shop.
Start with the basics: confirm which lights or systems are affected, inspect bulbs and fuses, and then move on to switches and wiring only if needed. For repeated blown fuses, heavy corrosion, or complex parasitic drains involving control modules, it is wise to see a qualified mechanic with proper diagnostic tools.
Use this guide as a reference whenever a light goes out or your battery keeps dying. The more familiar you become with your car’s electrical system, the easier it will be to spot small issues before they turn into big, expensive repairs.
How do you rate this guide?
Related Posts
Comments have been disabled.
