DIY Brake Pad and Rotor Replacement: Step‑by‑Step Guide to Safe, Quiet Brakes
Learn how to safely replace your own brake pads and rotors with this detailed DIY guide. Covers tools, safety steps, diagnosis, rotor inspection, pad bedding, and common mistakes that cause noise, vibration, and poor stopping power....

If your car squeals, grinds, or takes longer to stop, it’s probably time for new brake pads—and often rotors too. Paying a shop for brake work can get expensive, but with the right tools, information, and safety habits, many drivers can replace pads and rotors at home.
- 1. Is DIY Brake Work Right for You?
- 1.1. When You Should NOT DIY Brakes
- 2. Common Signs You Need Pads and Rotors
- 2.1. Symptoms of Worn Brake Pads
- 2.2. Symptoms of Bad or Warped Rotors
- 3. Parts and Tools You’ll Need
- 3.1. Basic Parts
- 3.2. Tools
- 4. Safety First: Preparing the Vehicle
- 4.1. 1. Park and Secure the Car
- 4.2. 2. Loosen Lug Nuts
- 4.3. 3. Lift and Support the Vehicle
- 5. Step‑by‑Step: Brake Pad and Rotor Replacement
- 5.1. Step 1: Remove the Wheel
- 5.2. Step 2: Inspect the Existing Brake Assembly
- 5.3. Step 3: Remove the Caliper
- 5.4. Step 4: Remove Old Pads and Hardware
- 5.5. Step 5: Remove the Caliper Bracket
- 5.6. Step 6: Remove the Old Rotor
- 5.7. Step 7: Clean the Hub and Prepare the New Rotor
- 5.8. Step 8: Install the New Rotor
- 5.9. Step 9: Service the Caliper Bracket and Slide Pins
- 5.10. Step 10: Reinstall the Caliper Bracket
- 5.11. Step 11: Compress the Caliper Piston
- 5.12. Step 12: Install New Brake Pads
- 5.13. Step 13: Reinstall the Caliper
- 5.14. Step 14: Reinstall the Wheel
- 5.15. Step 15: Repeat on the Other Side
- 6. After the Job: Pump, Check, and Bed the Brakes
- 6.1. 1. Pump the Brake Pedal
- 6.2. 2. Check Fluid Level and Leaks
- 6.3. 3. Bed (Break In) the New Pads and Rotors
- 7. Common DIY Mistakes and How to Avoid Them
- 7.1. 1. Forgetting to Torque Bolts and Lug Nuts
- 7.2. 2. Not Cleaning the Hub
- 7.3. 3. Skipping Slide Pin Service
- 7.4. 4. Getting Grease on the Rotor or Pad Surface
- 7.5. 5. Ignoring Other Worn Components
- 8. When to Replace Rotors vs Resurface Them
- 8.1. Replace Rotors If:
- 8.2. Resurfacing Might Be OK If:
- 9. Final Safety Checks and First Drive
This guide walks you through a complete DIY brake pad and rotor replacement on most front‑wheel‑drive and rear‑wheel‑drive passenger cars and light SUVs. We’ll cover how to diagnose worn brakes, what parts to buy, step‑by‑step replacement, and how to avoid the most common mistakes that lead to noise, vibration, or poor braking.
Is DIY Brake Work Right for You?


Brakes are a critical safety system. If you’re not comfortable working with heavy components, using jack stands, or following torque specs, it’s better to pay a professional. That said, if you can follow instructions carefully and work methodically, brake pad and rotor replacement is one of the most approachable DIY jobs.
When You Should NOT DIY Brakes
- Severe rust or corrosion on brake lines, calipers, or backing plates.
- Leaking brake fluid from hoses, lines, or calipers.
- ABS or stability control warning lights that indicate deeper system issues.
- Hybrid or EV systems where high‑voltage components are near brake parts—review your owner’s manual and, if in doubt, consult a pro. If you ever see a hybrid system warning, follow the guidance in Hybrid System Warning Light On: Causes, Diagnosis & Safe-Driving Guide.
If your vehicle is otherwise healthy and you’re dealing with worn pads or warped/scored rotors, DIY replacement is usually straightforward.
Common Signs You Need Pads and Rotors
Before buying parts, confirm that pads and/or rotors are actually the problem.
Symptoms of Worn Brake Pads
- High‑pitched squeal when braking: Many pads have wear indicators that squeal when the pad is nearly worn out.
- Grinding noise when braking: Pad friction material is gone and the metal backing plate is contacting the rotor—replace immediately.
- Longer stopping distance or a soft pedal (after ruling out air in the system or fluid leaks).
- Visual check: Less than ~3 mm (about 1/8″) of pad material remaining.
Symptoms of Bad or Warped Rotors
- Steering wheel shake or vibration when braking at speed.
- Pulsating brake pedal under light to moderate braking.
- Deep grooves, scoring, or cracks visible on the rotor surface.
- Blue spots or discoloration from overheating.
Vibration while braking can also be caused by suspension or wheel issues. If your car shakes even when you’re not braking, review other diagnostics (for example, dimming lights or drivetrain issues can point to separate problems—see Car Lights Dim While Driving: Electrical Causes, Diagnosis & Fixes for electrical side issues).
Parts and Tools You’ll Need
Basic Parts
- Brake pads (front, rear, or both as needed).
- Brake rotors (recommended to replace in pairs on the same axle).
- Brake cleaner (non‑chlorinated is often preferred).
- High‑temperature brake grease for slide pins and pad contact points.
- Anti‑seize compound (for hub/rotor mating surface and some hardware, if specified).
- New hardware kit (pad clips, abutment clips, sometimes slide pin boots).
Tools
- Floor jack and jack stands (never rely on the jack alone).
- Lug wrench or impact gun with correct socket.
- Socket set and ratchet (metric for most modern cars).
- Breaker bar for stubborn bolts.
- Torque wrench (for caliper bracket bolts and wheel lugs).
- C‑clamp or disc brake piston tool to compress caliper pistons.
- Wire brush for cleaning hub and hardware.
- Bungee cord or wire to hang the caliper (never let it dangle by the hose).
- Flathead screwdriver or small pry bar.
- Rubber mallet or hammer (for stuck rotors).
- Shop rags and safety glasses.
- Optional: impact screwdriver for rotor retaining screws (common on some Asian makes).
Safety First: Preparing the Vehicle
1. Park and Secure the Car
- Park on a level surface.
- Put the transmission in Park (or first gear for manuals). If you ever have trouble shifting out of Park, see Automatic Transmission Won’t Shift Out of Park: Causes, Diagnosis & Fixes.
- Engage the parking brake if you’re working on the front brakes. If working on the rear brakes and the parking brake uses the rear calipers, leave it off and chock the front wheels instead.
- Place wheel chocks on the opposite end of the car from where you’re working.
2. Loosen Lug Nuts
Before lifting the car, break the lug nuts loose (about a quarter turn) while the wheel is still on the ground. Do not fully remove them yet.
3. Lift and Support the Vehicle
- Locate the jack points in your owner’s manual.
- Lift the car with a floor jack and place jack stands under the recommended support points.
- Gently lower the car onto the stands and shake the vehicle slightly to confirm stability.
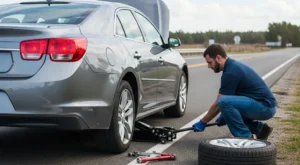
Step‑by‑Step: Brake Pad and Rotor Replacement

Step 1: Remove the Wheel
- Finish removing the lug nuts.
- Pull the wheel off and set it aside where it won’t roll away.
Step 2: Inspect the Existing Brake Assembly
- Look at pad thickness, rotor condition, and caliper condition.
- Check for fluid leaks around the caliper piston and hose connections.
- Note the orientation of pads and hardware—take photos if needed.
Step 3: Remove the Caliper
- Locate the caliper guide pin bolts (usually two small bolts on the back of the caliper).
- Remove the bolts and carefully slide the caliper off the rotor.
- Do not let the caliper hang by the brake hose. Use a bungee cord or wire to hang it from the suspension spring or frame.
Step 4: Remove Old Pads and Hardware
- Slide the old pads out of the caliper bracket.
- Remove any pad clips/abutment clips from the bracket.
- Inspect the clips for rust or deformation; you’ll usually replace them with new ones from the hardware kit.
Step 5: Remove the Caliper Bracket
- Locate the caliper bracket bolts (larger bolts on the back of the bracket).
- Use a breaker bar if needed; these bolts are often tight and may have thread locker.
- Remove the bracket and set it aside.
Step 6: Remove the Old Rotor
- Some rotors are held in place only by the wheel; others use retaining screws.
- If there are screws, remove them with the correct bit. An impact screwdriver may be necessary for stubborn screws.
- If the rotor is stuck from rust, tap around the hat (center) area with a rubber mallet or hammer until it loosens. Avoid striking the friction surface hard.
Step 7: Clean the Hub and Prepare the New Rotor
- Use a wire brush to clean rust and debris from the hub face. A clean, flat surface is critical to avoid rotor runout and vibration.
- Wipe the hub with brake cleaner and a rag.
- Apply a very thin film of anti‑seize to the hub face (optional but helpful in rust‑prone areas). Do not get any on the wheel studs or rotor friction surface.
- New rotors often come coated in oil to prevent rust. Spray both sides with brake cleaner and wipe until clean.
Step 8: Install the New Rotor
- Place the new rotor onto the hub, aligning any retaining screw holes if applicable.
- If your car uses rotor screws, reinstall them and snug them down.
- To keep the rotor from wobbling while you work, you can temporarily install a lug nut finger‑tight.
Step 9: Service the Caliper Bracket and Slide Pins
- Remove the slide pins from the caliper bracket (note their orientation; some are upper/lower specific).
- Wipe off old grease and inspect for rust, pitting, or damage.
- Apply a thin, even coat of high‑temp brake grease to the pins and reinstall them so they move smoothly.
- Install new pad clips/abutment clips from the hardware kit, making sure they’re fully seated.
Step 10: Reinstall the Caliper Bracket
- Position the bracket over the rotor and start the bolts by hand to avoid cross‑threading.
- Tighten the bolts to the factory torque spec (check a service manual or reliable database).
Step 11: Compress the Caliper Piston
- Before installing new, thicker pads, the caliper piston must be pushed back into its bore.
- Place an old pad against the piston face and use a C‑clamp or piston tool to slowly compress the piston.
- Watch the brake fluid reservoir under the hood; fluid level will rise. If it’s near the top, remove a small amount with a turkey baster or syringe to prevent overflow.
- For some rear calipers (especially with integrated parking brake), the piston must be rotated while pushing in using a special tool—do not force it straight in or you may damage the mechanism.
Step 12: Install New Brake Pads
- Apply a thin layer of brake grease to the pad ears (where they contact the clips) and to the backing plate where it contacts the caliper/piston. Do not get grease on the friction material.
- Slide the new pads into the bracket, ensuring the inner vs outer orientation matches the original setup (some pads are specific).
Step 13: Reinstall the Caliper
- Lower the caliper over the new pads.
- Ensure the slide pins line up with their holes in the caliper body.
- Install the guide pin bolts and tighten them to the specified torque.
Step 14: Reinstall the Wheel
- Remove any temporary lug nut used to hold the rotor.
- Mount the wheel and hand‑tighten all lug nuts in a star pattern.
- Lower the car off the jack stands.
- Torque the lug nuts to spec in a star pattern to ensure even clamping.
Step 15: Repeat on the Other Side
Always replace pads and rotors in pairs on the same axle (both fronts or both rears) to maintain balanced braking.
After the Job: Pump, Check, and Bed the Brakes
1. Pump the Brake Pedal
- Before driving, sit in the driver’s seat and pump the brake pedal several times until it becomes firm.
- This seats the pads against the rotors and takes up any clearance created when the pistons were compressed.
2. Check Fluid Level and Leaks
- Verify the brake fluid level is between MIN and MAX on the reservoir.
- Inspect each caliper and hose for any signs of fluid leaks.
3. Bed (Break In) the New Pads and Rotors
Proper bedding improves braking performance and reduces the chance of noise and vibration by evenly transferring pad material to the rotor surface.
- Find a safe, low‑traffic road.
- Perform 8–10 moderate stops from about 30–35 mph down to 5–10 mph, using firm but not panic braking.
- Allow the brakes to cool for a few minutes between stops (keep driving to get airflow).
- Avoid coming to a complete stop with very hot brakes and holding the pedal hard, which can imprint pad material on the rotor.
Common DIY Mistakes and How to Avoid Them
1. Forgetting to Torque Bolts and Lug Nuts
- Under‑torqued caliper bracket bolts can loosen and cause noise or even component failure.
- Over‑torqued or uneven lug nuts can warp rotors and lead to pedal pulsation.
- Always use a torque wrench and follow factory specs.
2. Not Cleaning the Hub
- Rust or debris on the hub can create rotor runout (wobble), felt as vibration when braking.
- Spend the extra few minutes with a wire brush; it’s crucial for smooth braking.
3. Skipping Slide Pin Service
- Dry or seized slide pins can cause uneven pad wear, pulling, or overheating.
- Always clean and re‑grease pins with high‑temp brake grease.
4. Getting Grease on the Rotor or Pad Surface
- Any lubricant on the friction surface reduces braking and can cause noise.
- If contamination occurs, clean thoroughly with brake cleaner and a clean rag.
5. Ignoring Other Worn Components
- Bad rubber hoses, leaking calipers, or severely rusted backing plates should be addressed at the same time.
- If you see cracked hoses or wet areas around fittings, stop and plan a more complete repair or consult a professional.
When to Replace Rotors vs Resurface Them
Some shops still resurface (turn) rotors, but with modern thin rotor designs and the low cost of many aftermarket rotors, replacement is often the better option.
Replace Rotors If:
- They’re below minimum thickness (stamped on the rotor hat or listed in service data).
- They have deep grooves, cracks, or heavy rust scaling.
- They cause persistent vibration even after proper cleaning and installation.
Resurfacing Might Be OK If:
- They’re above minimum thickness with only minor scoring or glazing.
- You have access to a quality brake lathe and can maintain proper runout and finish.
For most DIYers, installing new rotors with new pads is the simplest and most reliable approach.
Final Safety Checks and First Drive
- Verify all tools are removed from under the car.
- Double‑check lug nut torque after the first short drive.
- Listen for unusual noises: light rubbing or a faint smell during the first few stops can be normal as parts bed in, but loud grinding, clunks, or a soft pedal are not.
- If the brake pedal sinks, feels spongy, or the car pulls hard to one side, stop driving and re‑inspect your work or seek professional help.
With careful preparation, attention to detail, and respect for safety, DIY brake pad and rotor replacement can restore strong, quiet stopping power and save you significant money over shop prices. Take your time, follow each step, and your braking system will reward you with confidence every time you press the pedal.
How do you rate this guide?
Related Posts

Comments have been disabled.
